Blackboxing React Components
Blackboxing of React Component is a (self-named) process that I use in order to separate visual component from the logic layer.
As a refresher - visual components are the type of components which role is to "look nice". They can have some logic inside, but ultimately they're dumb. They don't reach out for data, they don't handle complex state changes, however they can render different elements reacting to props changes. Components that have complex logic in them are usually named Controller Components or Logic Components. While it’s a very good idea to aim for such separation, real life project have this line blurred.
Why use blackboxing at all? Some reasons include:
- it separates complex logic from visual design
- it helps making components portable (as logic is often application-specific)
- it helps with testing components with unit tests or in Storybook (dumb components take only props!)
- it helps with PR reviews (it’s easy to see if change was made to logic or to visual parts)
- it creates a difficulty divider which might be helpful when onboarding to React or grooming junior team members
Implementation of blackboxed component is simple:
- We start with dumb component that takes only props. Basic this-or-that and wrapping in theme/styling is good.
- Then we create connector function (which I named after Redux’ connectfunction) that will be our HOC wrapper.
- We hook up component with function and re-export
That’s it in a nutshell. I wouldn’t be surprised if you scratched your head with disbelief as you done it already. Yup. That is so simple.
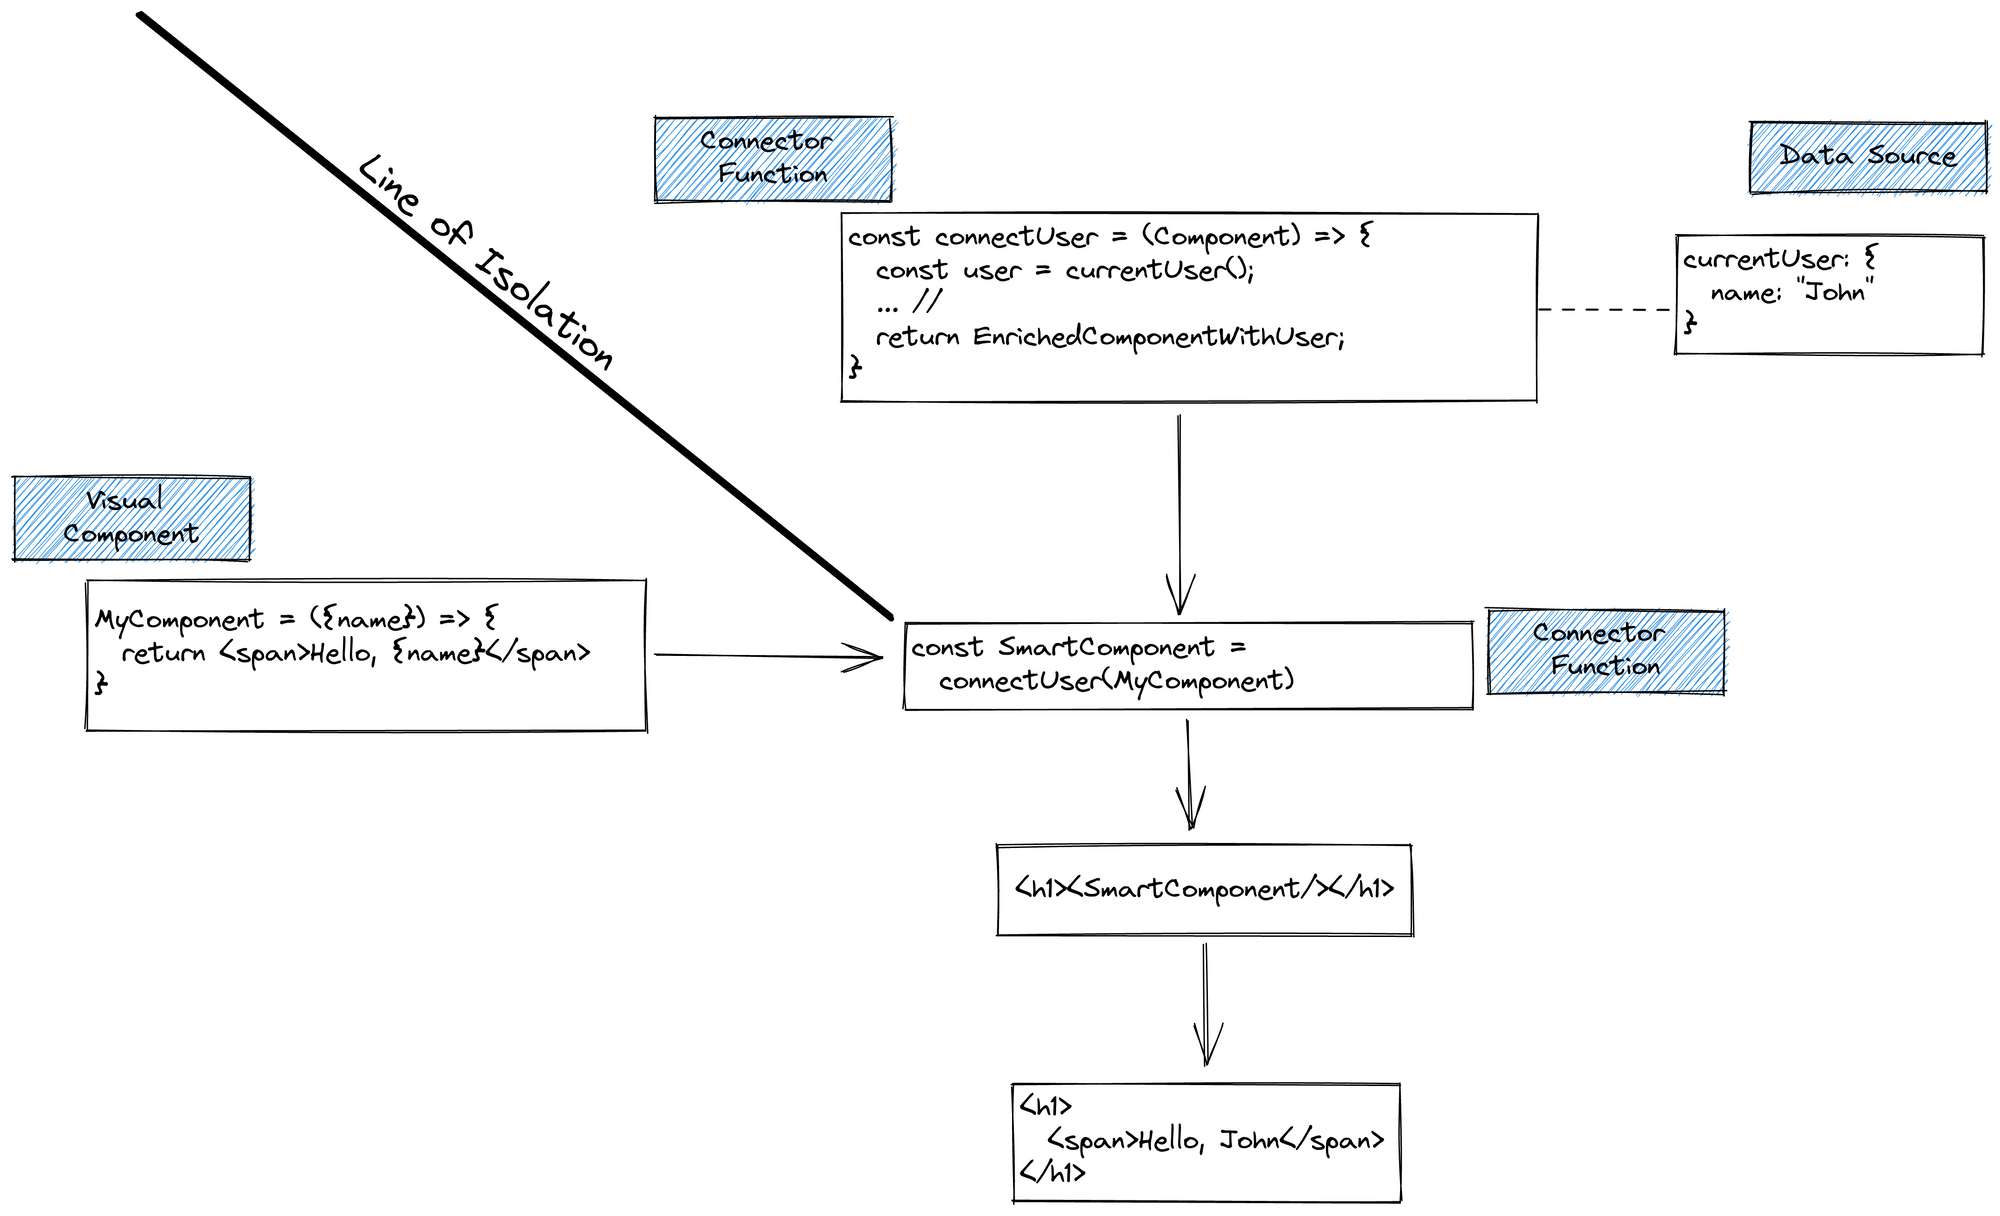
Before I get to code - I usually use Redux and connect function for it, but it can be literally anything - Apollo, SWR, fetch wrapper, any storage or plain object. As long as you can make higher order component and wrap original one to provide properties/actions we’re good to go.
Code
Let's see some example. We're doing pseudo-html submarine control!
const DepthIndicator = () => <div>1</div>
const Surface = () => <button>Surface</button>
const Submerge = () => <button>Submerge</button>

const Submarine = () => (
  <>
    <DepthIndicator />
    <Surface />
    <Submerge />
  </>
)
Nothing interesting here. Simple mockup, and I'm going to start with it. Let's hook up absolute minimal Redux state:
import { Provider } from 'react-redux';
import { configureStore } from "@reduxjs/toolkit";

const initialState = {
    submarineState: {
        depth: 0
    }
}

const reducer = (state = initialState, action) => {
    return state;
}
const store = configureStore({ reducer })

const App = () => (
  <Provider store={store}>
    <Submarine />
  </Provider>
)
Cool. Time to de-dumbify slightly by providing props.
const DepthIndicator = ({ depth }) => <div>{depth}</div>
const Surface = ({handleSurface}) => <button onClick={handleSurface}>Surface</button>
const Submerge = ({handleSubmerge}) => <button onClick={handleSubmerge}>Submerge</button>
At this point work with components is finished. We can hand them off for design grooming while we're working on the features. From now on I'll refer to those components with "X" prefix as if I would import them from imaginary kitchensink:
import {
  DepthIndicator as XDepthIndicator,
  Surface as XSurface,
  Submerge as XSubmerge
} from './Kitchensink.js'
Anyway, time to get connecting, our first connector function:
import { connect } from 'react-redux'

const submarineConnector = connect(
    ({ submarineState: { depth } }) => ({ depth })
)
...and let's make our indicator "smart":
const DepthIndicator = submarineConnector(XDepthIndicator)
For handling submerge and surface we need to do slightly more. No longer we're linking with state, but we also need to connect to event handlers (which in our case is going to be Redux dispatcher):
 const submarineConnector = connect(
    ({ submarineState: { depth } }) => ({ depth }), // Map State
    (dispatch) => ({
        handleSurface: () => dispatch({type: 'surface'}),
        handleSubmerge: () => dispatch({type: 'submerge'}),
    }) // Map Dispatch
)
Redux sometimes feels plentiful (and I'd agree) but once one gets familiar it gets very easy. For connect, my connector factory, I provide two parameters - first one is a function that gives component properties from known state (with some ES6 deconstructor magic). The other one is a function that links components with function that can dispatch actions, changing our state.
Since React is very TIMTOWTDI, you can see tens, if not hundreds of variation of the same code, but principle stays. There is nothing more, component is fully smartified.
Full code to play with:
import {connect, Provider} from 'react-redux';
import { configureStore } from "@reduxjs/toolkit";

const initialState = {
    submarineState: {
        depth: 0
    }
}
const reducer = (state = initialState, action) => {
    switch(action.type) {
        case 'submerge':
            return Object.assign({}, state, {submarineState: { depth: -100 }})
        case 'surface':
            return Object.assign({}, state, {submarineState: { depth: 0 }})
        default:
            return state
    }
}

const store = configureStore({reducer})

const XDepthIndicator = ({depth}) => <div>{depth}</div>
const XSurface = ({handleSurface}) => <button onClick={handleSurface}>Surface</button>
const XSubmerge = ({handleSubmerge}) => <button onClick={handleSubmerge}>Submerge</button>

const submarineConnector = connect(
    ({ submarineState: { depth } }) => ({ depth }), // Map State
    (dispatch) => ({
        handleSurface: () => dispatch({type: 'surface'}),
        handleSubmerge: () => dispatch({type: 'submerge'}),
    })
)
const DepthIndicator = submarineConnector(XDepthIndicator)
const Surface = submarineConnector(XSurface)
const Submerge = submarineConnector(XSubmerge)

const App = () => (
    <Provider store={store}>
        <Submarine />
    </Provider>
)

const Submarine = () => (
    <>
        <DepthIndicator />
        <Surface />
        <Submerge />
    </>
)
I'd like to highlight few things:
- Initial structure of
Submarinethat was roughly drafted at the beginning - didn't change - Mocked dumb components didn't change after initial conception (as each had only single item to work with)
- Dumb version of components is very easy to test in given state
- We don't care about dumb components - they could be styled or passed over for further refinement - they're just as isolated from logic as is logic from visual fidelity
Obviously, rarely components stay that simple. They have branching logic (sometimes contradicting), they split off render on callback's etc, but I have yet to find situation in which such blackboxing is not possible.
Tips
If you decide to use this technique there are few tips I can provide. When there is no blackboxing in project (e.g. project is bootstrapping or I'm working on big refactor) I tend to use one of the following naming conventions:
- XComponent for dumb ones and Component for connected (like in example above)
- Component for dumb one and ConnectedComponent for connected one
They both indicate that there is sibling or non-wrapped counterpart. Such components are easily greppable in project code. I prefer former approach but some teams work with more descriptive names. I do try to avoid total name variations if possible, e.g. Button and then LoginAction, BuyAction.
I haven't mentioned "hard" part, that is separating pieces into files. It's a hard topic, somewhat matter of preference and part of the development magic, but to give straight and simple answer:
- Everything in one file when developing
- Logic in 1 file, dumb components to another one
- If file exceeds (rule of the thumb) 400 lines - split off to new one
Finally: If possible, use TypeScript and Redux. They will give you grey hairs and will melt your soul, but they are project savers if project lives long enough to achieve big ball of mud stage.